Being the biggest fans of the shin in all its guises we although could not dare to cook it with our own hands using the new technology. I was all in doubts! But with the help of the unique sous vide technology, we had to try to prepare the shin and bring its taste closer to the taste of the Czech Knee Boar.
The cooking method can be divided into three main parts:
- Preparation of the brine – takes about 10 hours
- Cooking the shin in sous vide itself – takes about 24 hours
- Finishing (15 minutes)
A fresh shin must be thoroughly rinsed under running water and a little scraped off with a knife. We chose a medium-sized shin for two reasons:
- firstly, it can fit in a 20*30 vacuum bag that we use
- secondly, it fits perfectly into the holder.
It’s a drastic mistake to think you can cook a shin with a milticooker without a bag, even if it’s cooced under 70 degrees. We tried and it turned out to be something indistinct, crumbling and greasy. The multicooker is still not a sous vide as it does not show the exact temperature and does not constantly hold it. Plus the milticooker absorbs all the smells, after which you will just have to throw it away.
In general, this device, in spite of its close family ties with the sous vide technology, is not suitable for cooking shin.
We continue – the shin is clean and ready for further processing. Some people suggest brine injection, while others add nitrite salt and monosodium glutamate to enhance flavor and increase shelf life. We decided to abstain from all of those.
We will tell you how to cook brine. We put about 50 grams of salt per liter of water, add 2-3 pieces of bay leaves, 2 cloves of pressed garlic and all the spices — 10 peas of black pepper, a sprig of thyme, knead a handful of coriander in a pounder.
We advise you to experiment with spices, but usually it all comes down to either adjika or saffron. It worked well, but let’s be honest, a little too simple.
We put the shin in brine for the whole night, after making several holes from the upper end with a knife with a thin long blade. You must be aware that the shin cannot be stuffed with garlic, Please note that I DO NOT stuff the shank with garlic – in the sous vide technology, garlic is a persona nongrata.
In the morning we take out the shin from the brine, let it drain, blot the shank with a towel, remove excess moisture and pack it in a bag intended for sous vide.
Next, we immerse the shin in a bath preheated to 68C, set the timer for 24 hours. This is the maximum time that, at this temperature, when we can achieve the medium Rare state for a tough piece of pork. Want Welldone? Then put 85C for 12 hours.
We take out the package from the bath and then proceed based on the situation:
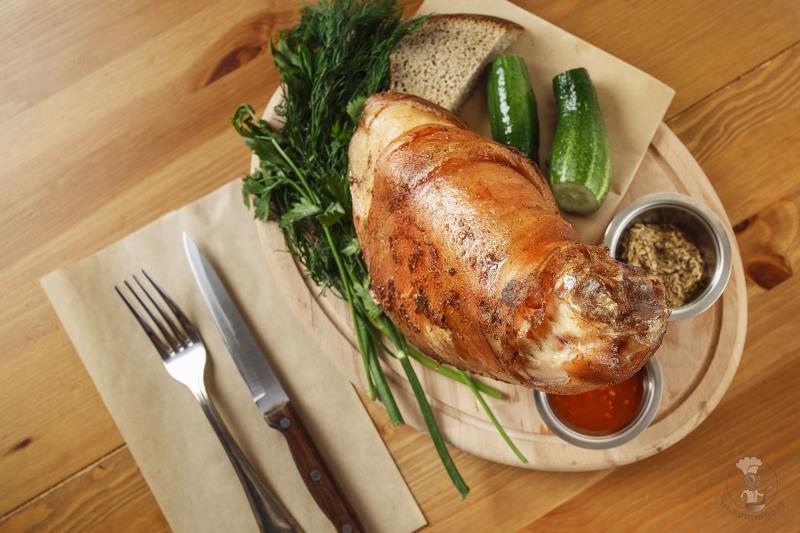
Immediately place in a hot skillet and color in the oven for a few minutes by pouring with a honey and mustard glaze. Then serve.
Place the bag in a bath of ice and cold water for 20 minutes. Now the workpiece can be stored in the refrigerator in chamber zero exactly until we want to use the workpiece. Shock freezers in high class restaurants are used exactly for this purpose.
Actually, this is where we can take our leave, wishing the reader a bon appetit!
Remember that the shin is still an atmospheric dish, so to eat it in the “business lunch” style and return to work would be like running through the Louvre in 10 minutes – that is a waste of time and not quenching your thirst for perfectionism. Therefore, we recommend that you attend to the correct presentation. And for this we have in our arsenal a board with a “spear” and a board with a holder for the shank.
- Shin 1 piece
- Salt 50 gr
- Black pepper 10 peas
- Bay leaf 3 pcs
- Honey 1 tbsp
- Dijon mustard 2 tbsp
- Garlic 3 cloves
- Thyme 1 sprig
- Coriander 1 tbsp